
I started working on my own custom vault in Obsidian over two years ago to help me organize, outline, and write my sci-fi novel. I wanted a modern, minimal, and easy-to-use interface for worldbuilding and storytelling, and the rest is history.
Publishing ‘The Novelist’ on my Medium blog brought me a lot of great feedback, and the most important request of all? A documentation so people who have no idea what the heck is Obsidian and The Novelist vault to quickly set it up and start using it.
I did put a documentation.html file inside the 2.1 version that included a lot of info, but this article will cover all your questions, and it’s filled with images and step-by-step guides.
The basics: What is Obsidian and ‘The Novelist‘ vault
Created during the COVID-19 pandemic by Shida Li and Erica Xu, Obsidian’s first beta release came on March 30, 2020, and the first 1.0.0 version was released on October 13, 2022. It’s a personal knowledge base and note-taking app that fully supports and operates on Markdown files, and one that people often characterize as “your second brain”.
Obsidian is free to download and use, and it’s open-source, meaning anyone can download and see its whole code, build upon it, and share it with the world. Thousands of people are helping make Obsidian better by creating and offering their own plugins and themes, or even whole Vaults.
Obsidian is available for Windows, macOS, Linux, Android, and iOS.
Because it’s open-source and works locally, Obsidian doesn’t collect or store your data, documents, or anything that you include in your Vaults in their cloud servers. They do only if you choose to get one of their premium tiers, but you always have the choice to choose an alternative way, such as storing them in your own self-hosted cloud platform (e,g, NextCloud) or on Google Drive, Dropbox, Microsoft OneDrive, Terabox, etc.
What is Markdown?
Markdown in Obsidian (and in general) is a simple way to format text using plain symbols instead of buttons, so you write normally, but add small marks to style things: for example, # Title makes a heading, **bold** makes text bold, *italic* makes it italic, and [link](url) creates a link.
The key idea is that your notes stay as clean, readable text files (no heavy formatting), but still look nicely structured when viewed in apps like Obsidian, making it perfect for writing, organizing ideas, and keeping everything future-proof.
People who don’t like Markdown format can easily install the “Editing Toolbar” plugin, which gives them all the formatting options they need (which is included in ‘The Novelist‘ Vault).
What are plugins?
If you open Obsidian’s Settings, you’ll find two options: ‘Core Plugins‘ and ‘Community Plugins‘. The first refers to the plugins that the team built and added to Obsidian, which users can enable or disable at any time.
For example, one plugin is for allowing you to record your voice and have your recordings in your notes, one for syncing your files, one for enabling bookmarking, one for file recovery, among others.
The second refers to plugins made and maintained by companies or developers from all around the world. For example, you can find plugins for drawing, for adding custom icons to your folders, setting up writing goals, changing the fonts and sizes, and so much more.
What are themes?
Obsidian comes with its own default and simple interface, and that includes everything you see in the app, from the colors, fonts, sizes, etc. You can change all of that. Either by writing your own custom code, or using a pre-made theme made by other folks.
In Obsidian’s Settings, you’ll find the ‘Appearance‘ section, where you can browse all the available themes, and you can quickly install, remove, or switch between them. Plugins such as the ‘Style Settings‘ will allow you to adjust the theme’s colors, fonts, sizes, and more, while many will give you the option to enable or disable some of their features.
What are Vaults?
In short, a Vault in Obsidian is just a folder on your computer where all your notes live. Every note you write is just a .md (Markdown) file, and all those files are stored inside one folder → your Vault. You can have one Vault or many Vaults, depending on how you want to organize your life, and all can have different names and purposes. Personally, I love using multiple Vaults for different needs (one for storytelling and worldbuilding, one for all my ideas, thoughts, and projects, and one for my clients). Others, on the other hand, prefer having everything in one Vault. Nothing’s wrong as long as it works well for you.
If Obsidian is free, why do they offer premium tiers?
You can download, install, and use Obsidian completely for free. To help the team behind it, you can choose one of their premium tiers, which basically gives you two features: Auto synchronization and publishing files online, both of which use Obsidian’s cloud servers. You can get both of these features for free using third-party plugins, but getting a plan means you’re significantly helping with the app’s development and future.
The Novelist is a Vault that I created for worldbuilding and novel writing. I did that when I couldn’t find a proper application to organize everything and write my novel, struggling with multiple apps for different purposes that turned my idea into chaos.
As a whole, it’s an app that allows you to write and organize all of your chapters, characters, locations, notes, ideas, thoughts, and so much more that your story may include.
The best of all? You can quickly adjust, edit, or remove anything it has, and all of that completely for free and without risking your privacy and online safety. Your Vault, no data collection, no rules or licensing. Free to do whatever you want with it.
Setting up everything
Now that you know a thing or two about Obsidian, let’s go and install it, and then set up The Novelist Vault so you can start writing and worldbuilding.
Downloading and setting up Obsidian
Before we start, it’s important to download and set up everything on a desktop computer or a laptop first. The mobile app is great, but importing Vaults requires more steps and work, so it’s recommended to do everything from a desktop operating system and then synchronize your Vaults to your mobile or tablet device.
Creating or importing several Vaults in Obsidian is very easy. Typically, the process is the same for all Vaults: You import the files, you accept to enable the community plugins and trust the Vault, and you’re good to go. Simple as that.
Download and install Obsidian
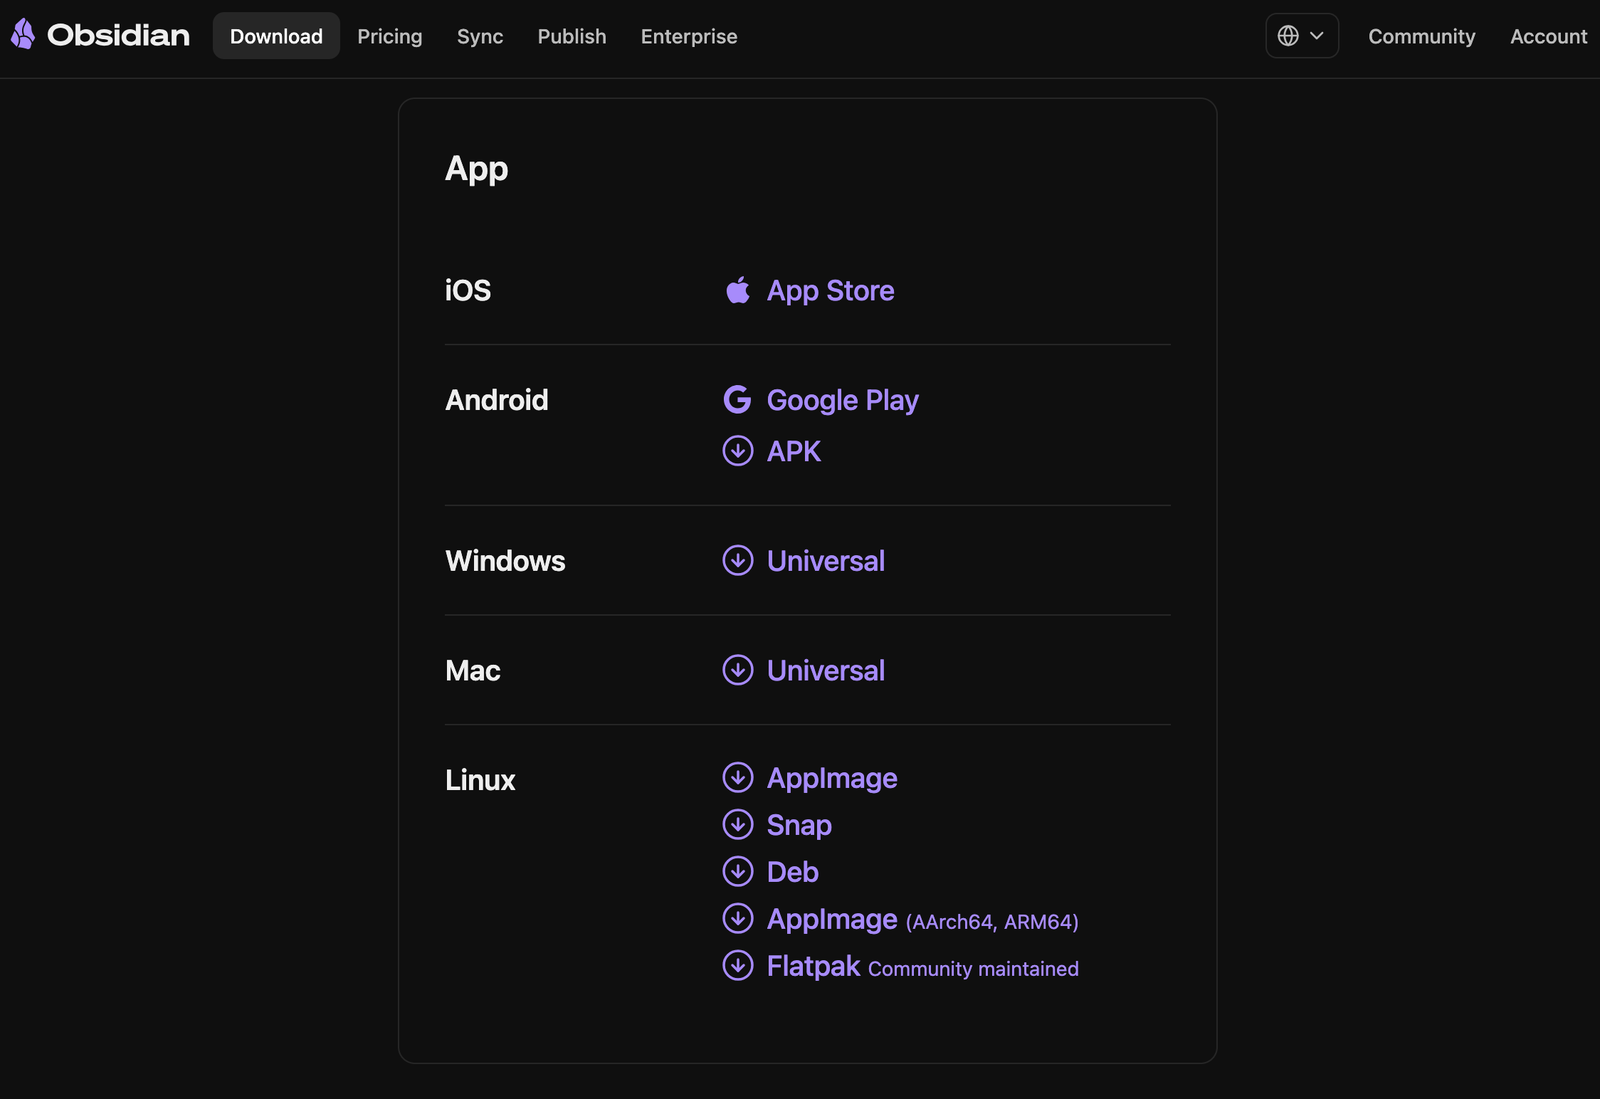
Visit the Obsidian.md website and download the latest version for Windows, macOS, or Linux. The Android version is available on the Google Play Store and in the Apple App Store for iOS. On Windows, installing Obsidian is as easy as clicking “Next” all the time. On macOS, double-click, drag Obsidian’s icon to the “Applications” folder, and you’re good to go.
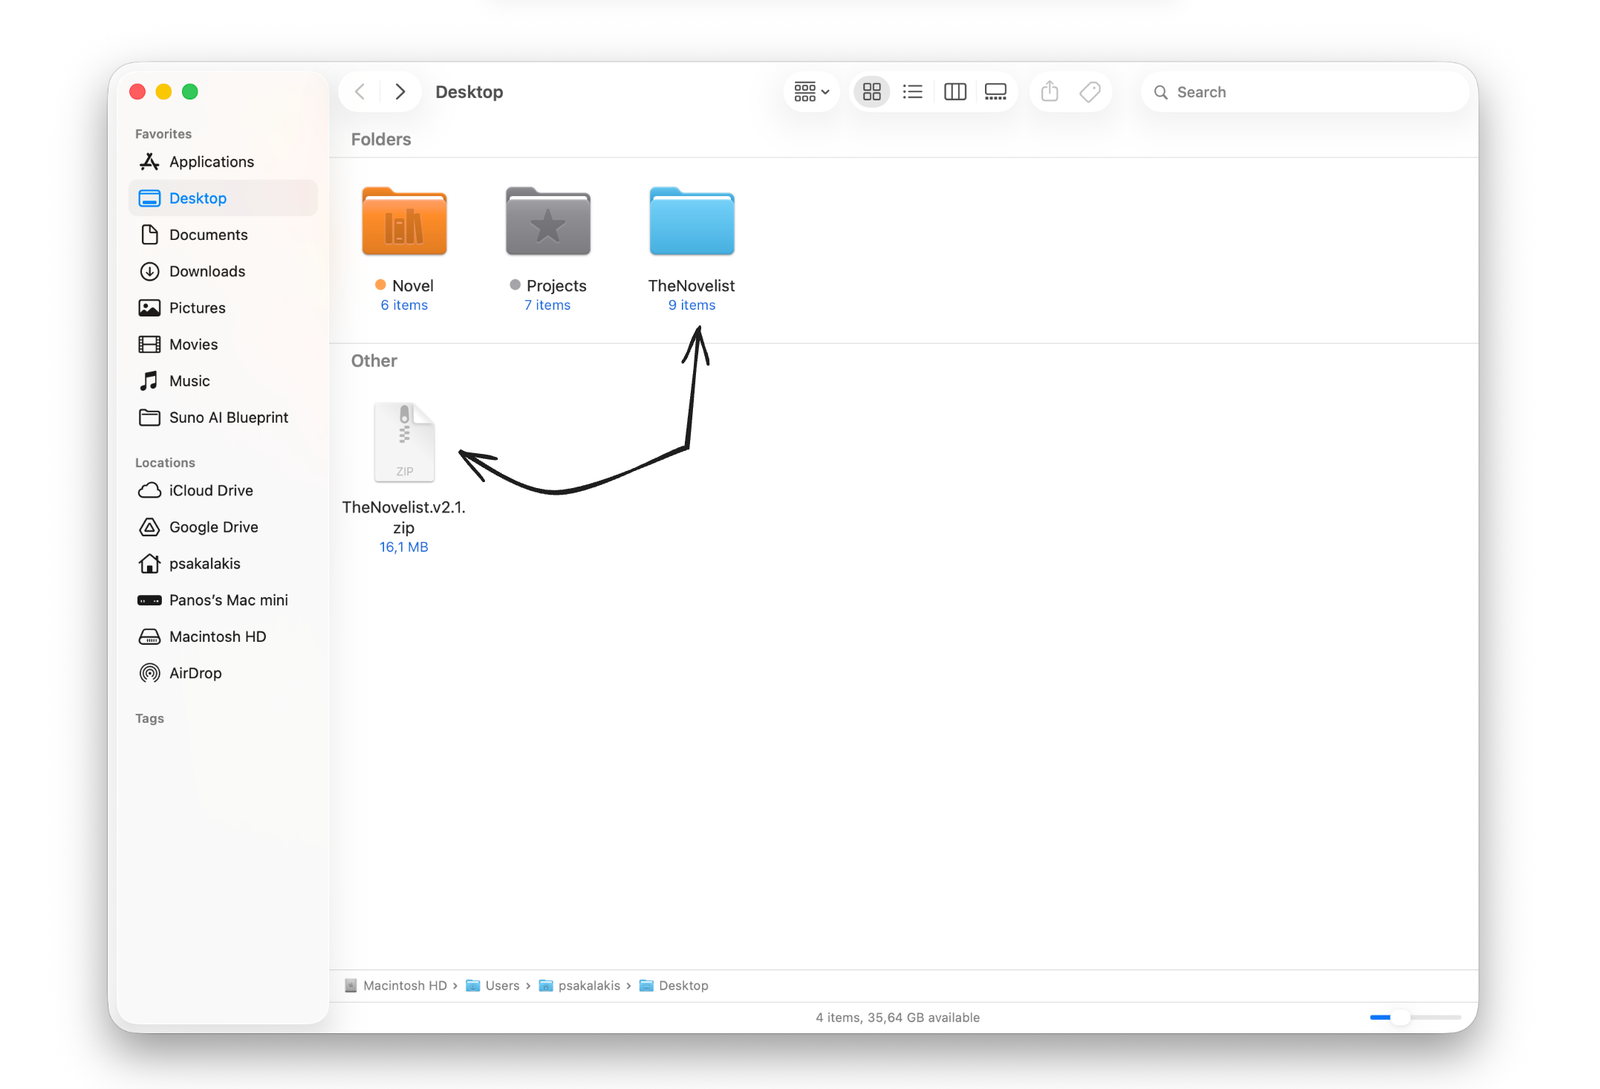
Download and unzip ‘The Novelist’ Vault
Import ‘The Novelist’ Vault
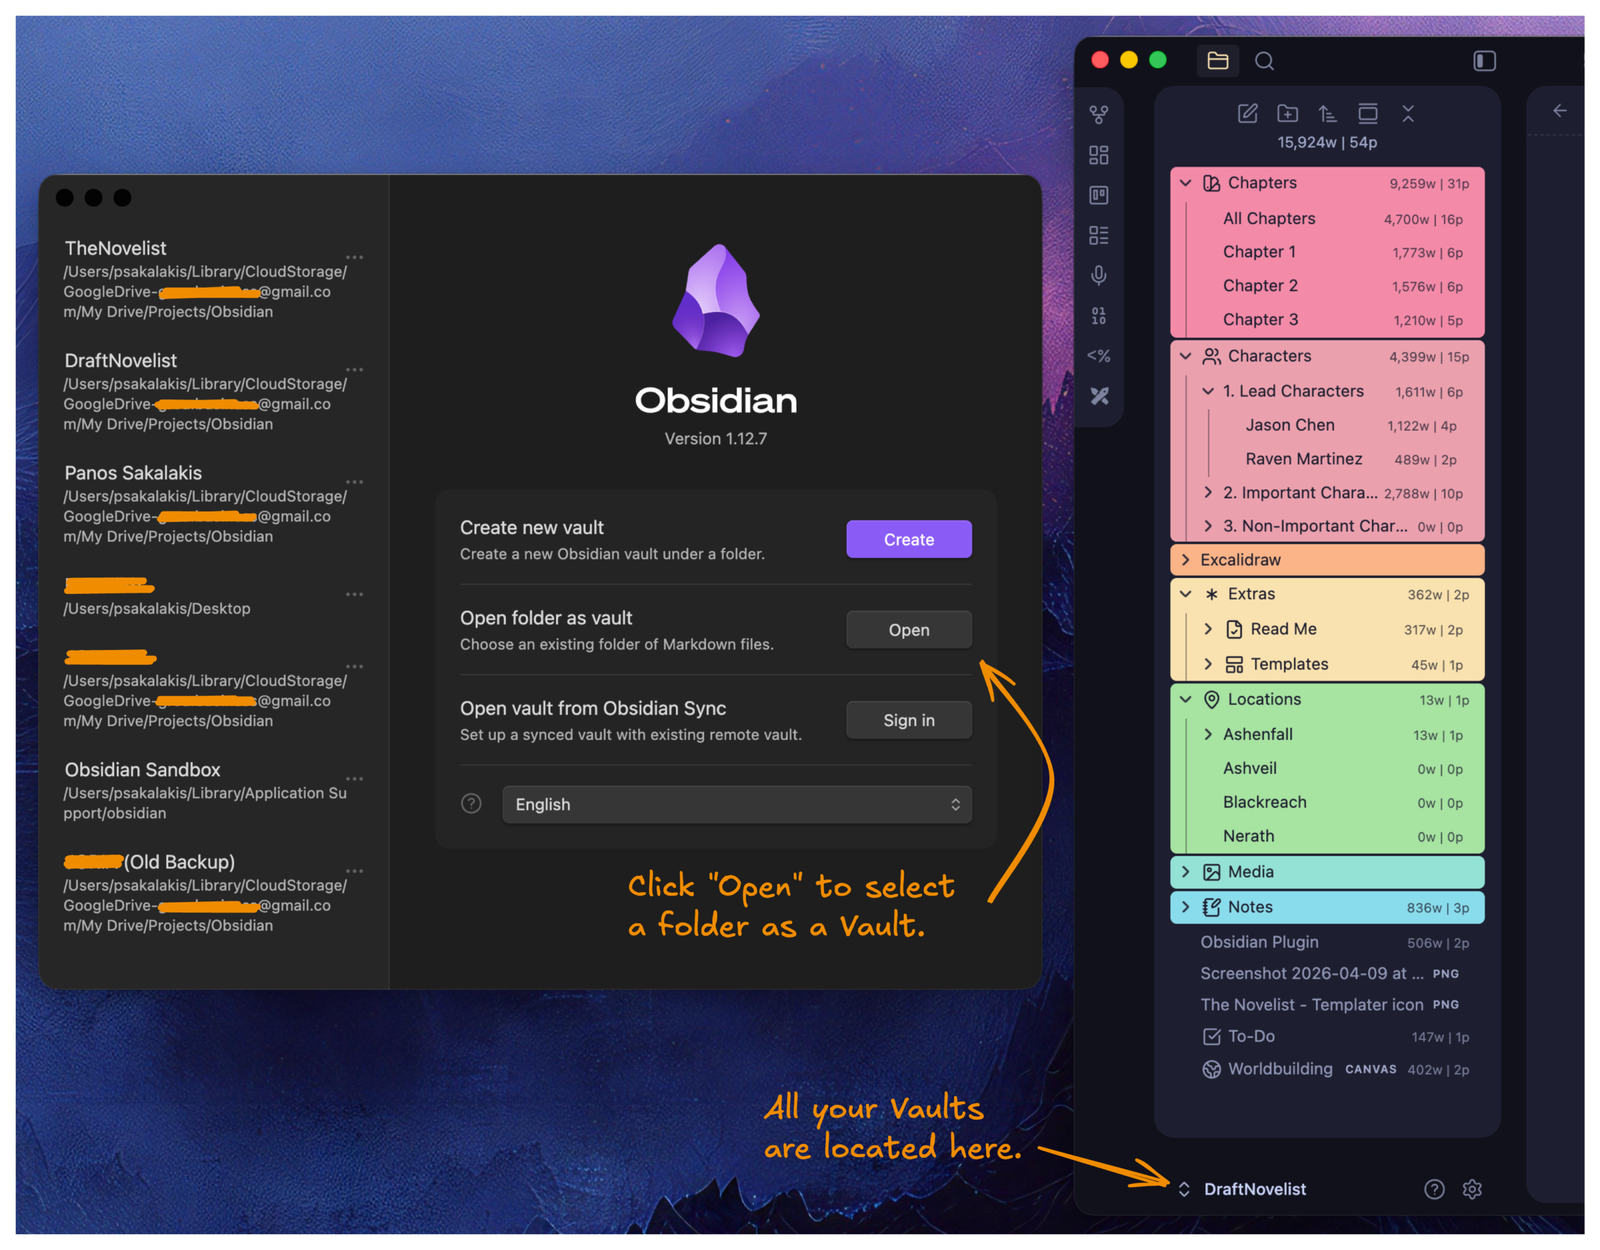
If this is the first time installing Obsidian, you’ll see the options: “Create a new Vault” and “Open folder as vault“. Choose the second option, and select ‘The Novelist‘ folder that you unzipped earlier.
Enable the community plugins

Because ‘The Novelist’ uses third-party plugins and themes, a pop-up window will be displayed asking you to enable the community plugins and trust the vault. It’s important to accept and enable them if you want the vault to work as intended.
Welcome to ‘The Novelist’ Vault!
Quick tip: If you’re using Google Drive, Microsoft OneDrive, Dropbox, or any other cloud platform that has a native application that you installed on Windows, macOS, or Linux, then you can select to store your Vaults there, and it will automatically synchronize everything. Alternatively, you can store them wherever you like, whether that’s a cloud server, your disk, an external disk, or even a USB device.
How to use ‘The novelist’ for novel writing and worldbuilding
This is where you can learn everything there is to know about ‘The Novelist’. But because I’m just a human being, please feel free to use the comment form at the end to ask your questions or ask for help if I haven’t mentioned something.
The ‘File explorer’
The ‘File Explorer’ is located on the left sidebar and shows all your folders, notes, media, and everything that you add to your vault. You can create, rename, delete, and organize all your files from this sidebar.
Here’s what ‘The Novelist’ includes:

Here’s how to work with the ‘File Explorer’:
How to create new notes and folders
Either click on the icons located at the top to create a new note or folder, or right-click and select “New note“, “New folder“, “New Canvas“, etc.
How to delete a folder or note
You can delete anything by right-clicking on it and selecting “Delete”.
How to organize your folders and files
You can drag and drop your notes into folders, and the same for folders if you want to add them as sub-folders.
If you take a few minutes to look at Obsidian’s default interface, it’s not that different from what ‘The Novelist’ offers, just with a few adjustments. A few icons here and there, a File Explorer on the left sidebar, and right-clicking or drag-and-dropping for the basic options.
Creating and/or inserting templates
One of the best features in The Novelist is the ability to insert with 1-click any pre-made template that you want, based on your needs. Instead of wasting time writing everything from scratch, a single click will insert everything for you.
The templates
For now, the vault includes two main pre-made templates:
- ‘Character’ Template: This one will automatically load all the necessary information your characters should have, including name, description, gender, and role
- ‘Location’ Template: This one will automatically load all the necessary properties for your locations, such as the name, number of people living there, the description of the atmosphere and mood, etc.
Note: To be able to insert or create your own custom pre-made templates, you need to keep the ‘Templater‘ plugin installed and activated. Without it, you won’t see the option.
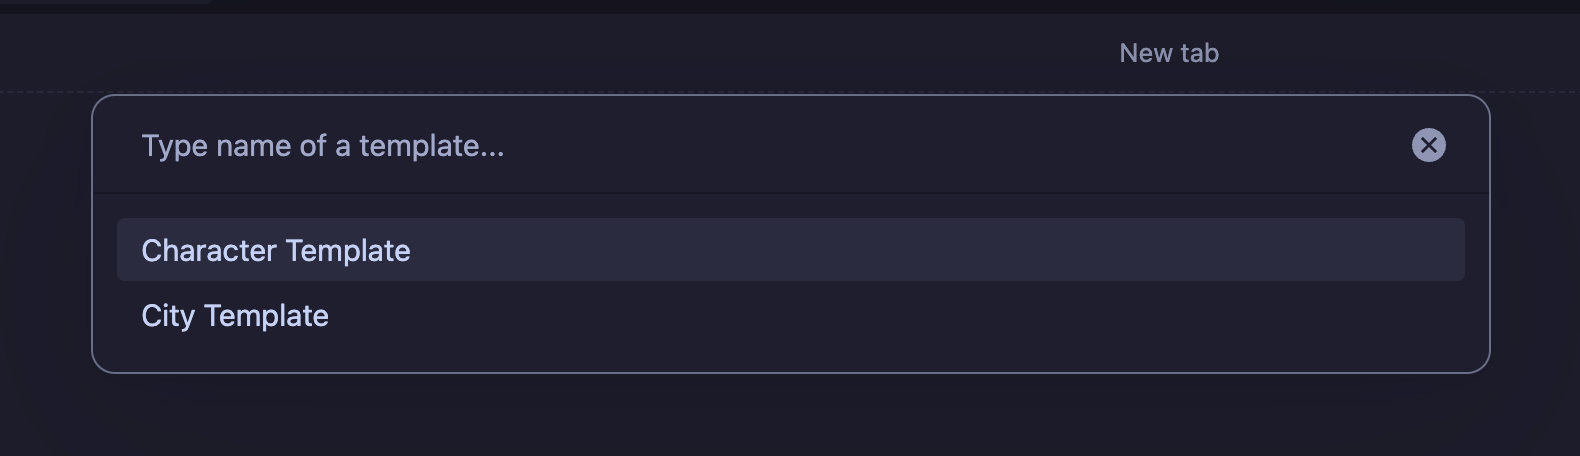
How to insert a template
To insert any pre-made template, simply click on the ‘Templater’ icon (located on the left side panel).
Once the pop-up window opens up (see example below), select the template that you want to insert into your note and click Enter.
You can also go to Obsidian’s Settings, find the ‘Templater‘ section, and set up a keyboard shortcut to open the pop-up window instantly.
How to fix the pop-up window to only display the templates
Unfortunately, when you import ‘The Novelist’ vault, you’ll have to manually select the main folder that includes all the pre-made templates. If you don’t, you’ll see a huge list that includes all your notes.
To fix that, go to Settings → Templater → Template Folder Location and select the “Templates” folder, which is located under the “Extras” folder.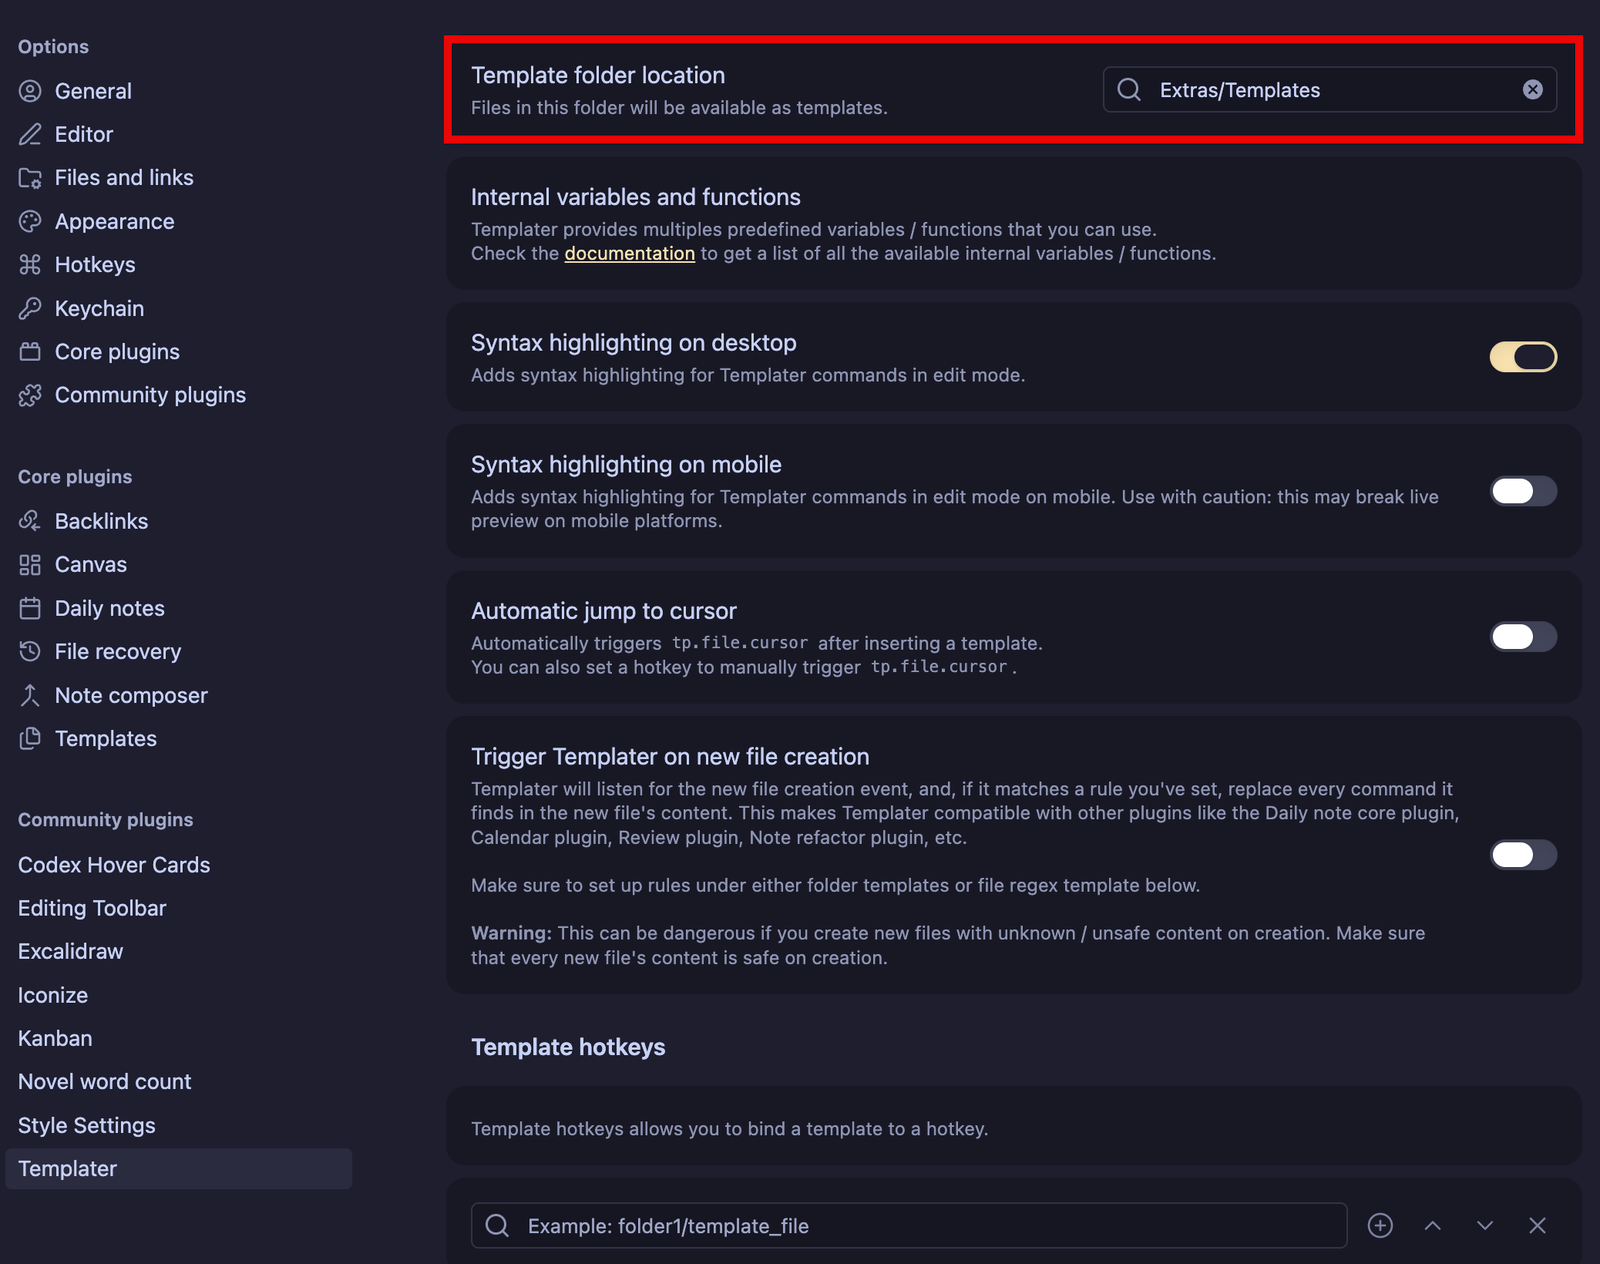
How to create your own custom templates
Don’t just wait for me to create more templates; I may not be able to create something that truly works for your own story and world. So, for that, you may want to create your own custom templates and insert them in the same way I showed you above.
- Inside the Extras → Templates folder, create a new note. Let’s call it
Alien Character Template.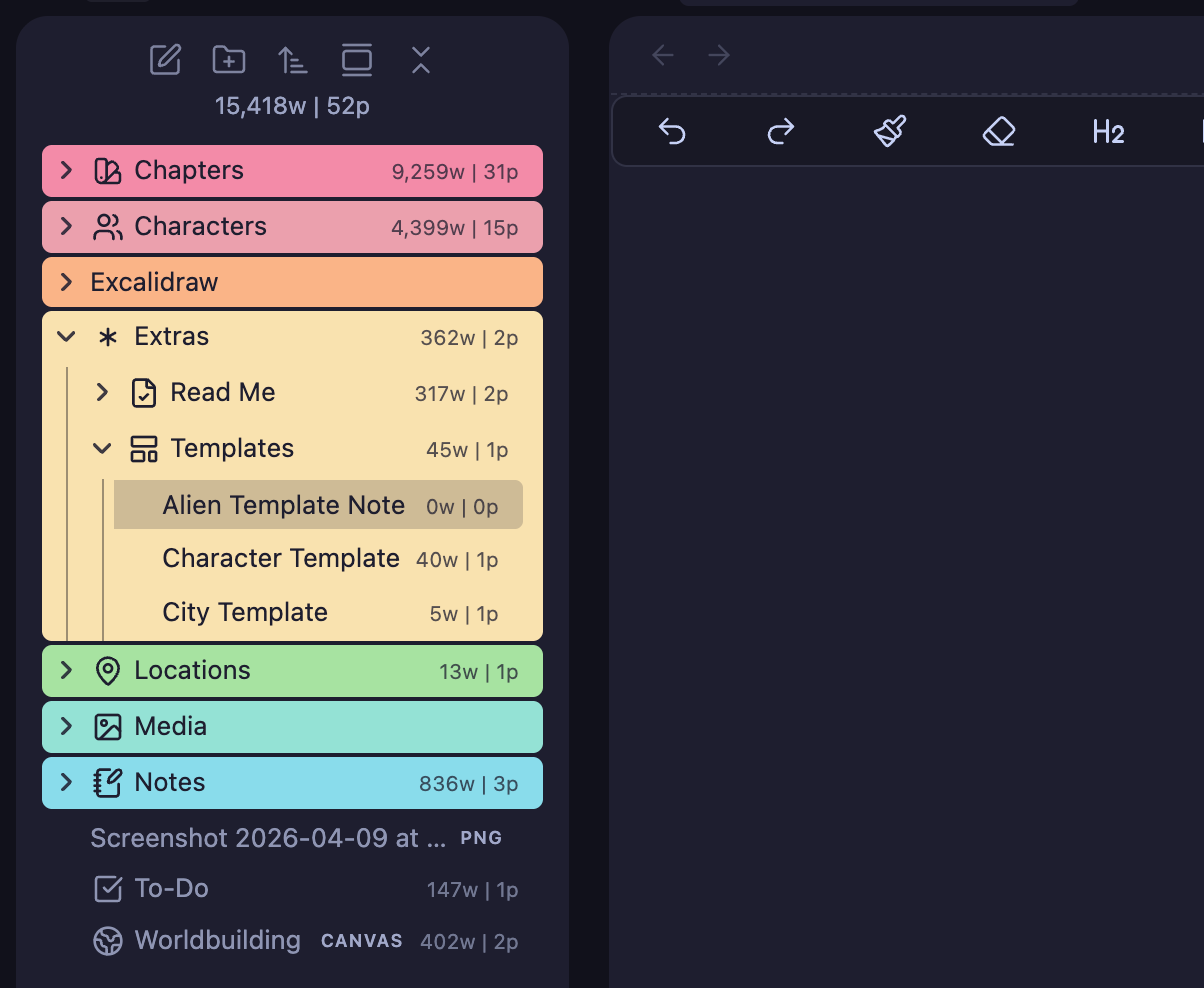
- Click inside the editor to write, and start by adding three dashes
---. That will automatically load the ‘Properties‘, where you can start adding all the information that you want your template to include.
That’s it! You can insert your custom template once you’ve structured it, and you can make as many as you want.
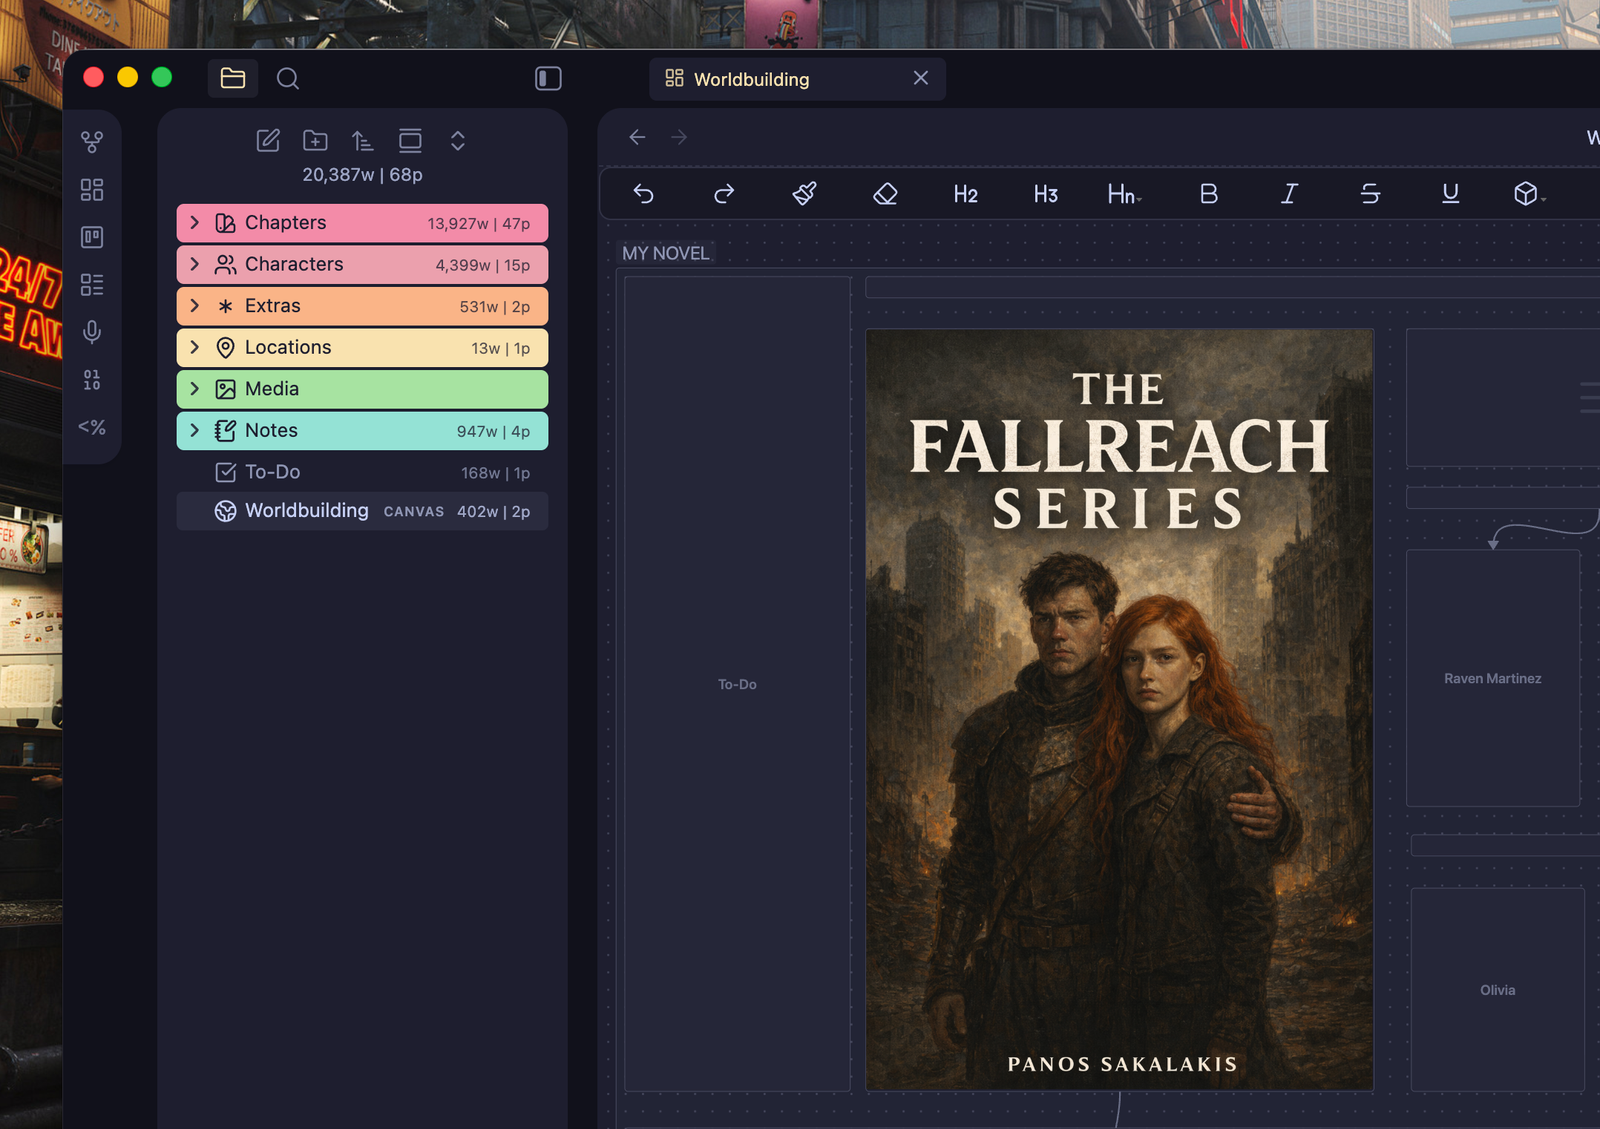
Worldbuilding with Canvas
Obsidian has a built-in plugin called “Canvas”. Once you enable it (it’s already enabled in ‘The Novelist’ by default), you can quickly create as many Canvas as you want. For this vault, I created one that works fairly well for novel-writing and worldbuilding, including everything I need and I want to quickly access.
To access the Worldbuilding Canvas, just click the “Worldbuilding” Canvas/Note that’s located at the bottom of the ‘File Explorer‘.
Those Canvas pages work with cards. Basically, you can add as many cards as you want by right-clicking on a blank spot and selecting “Add card“.
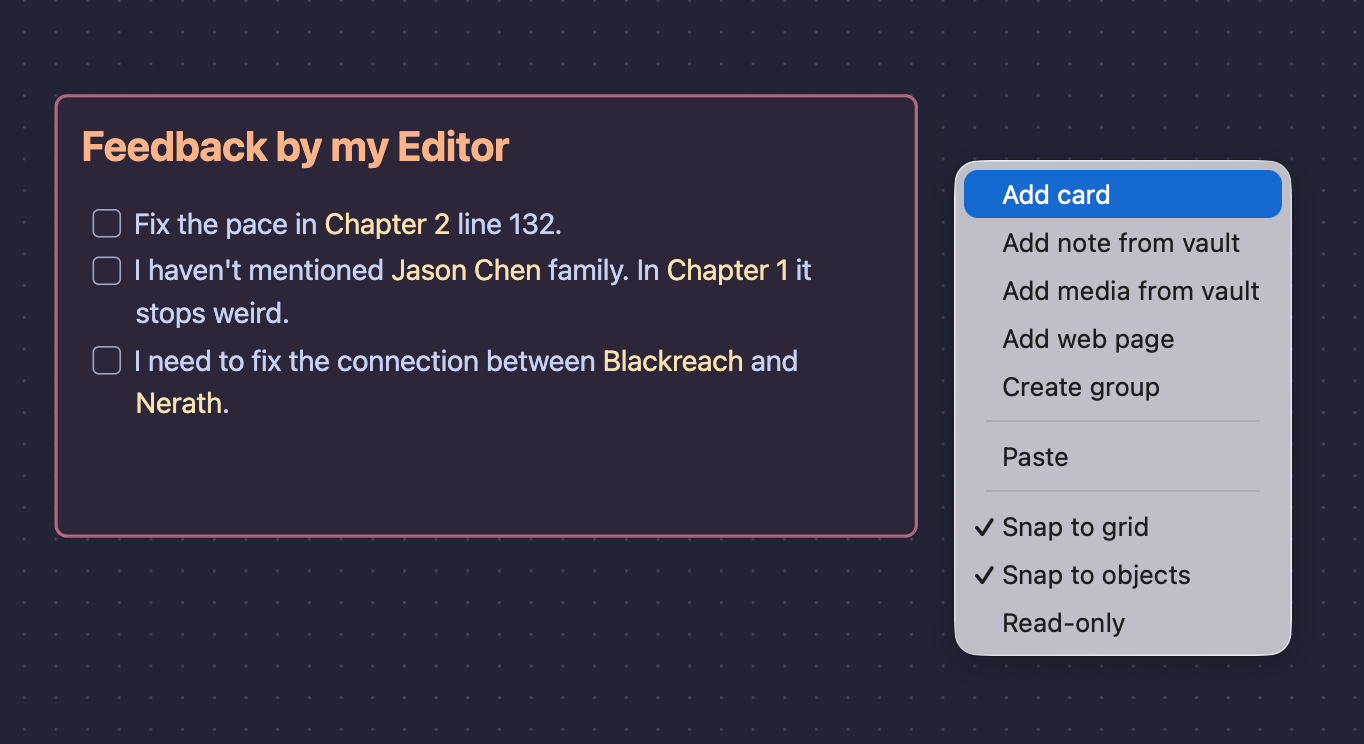
You can move any card by dragging it, change its color or size by selecting it and right-clicking on it, or even its color by clicking on it and selecting a color.
You can adjust everything by right-clicking or left-clicking either on a card or on a blank spot. For example, if you select a card, right-click on it, and select “Convert to file“, it will create a new note that you’d be able to access from the ‘File Explorer’.
You can also add that line that connects the cards together by hovering your cursor over a card and dragging any of the four dots that will be displayed at each side.
To-do lists, but Kanban Board style
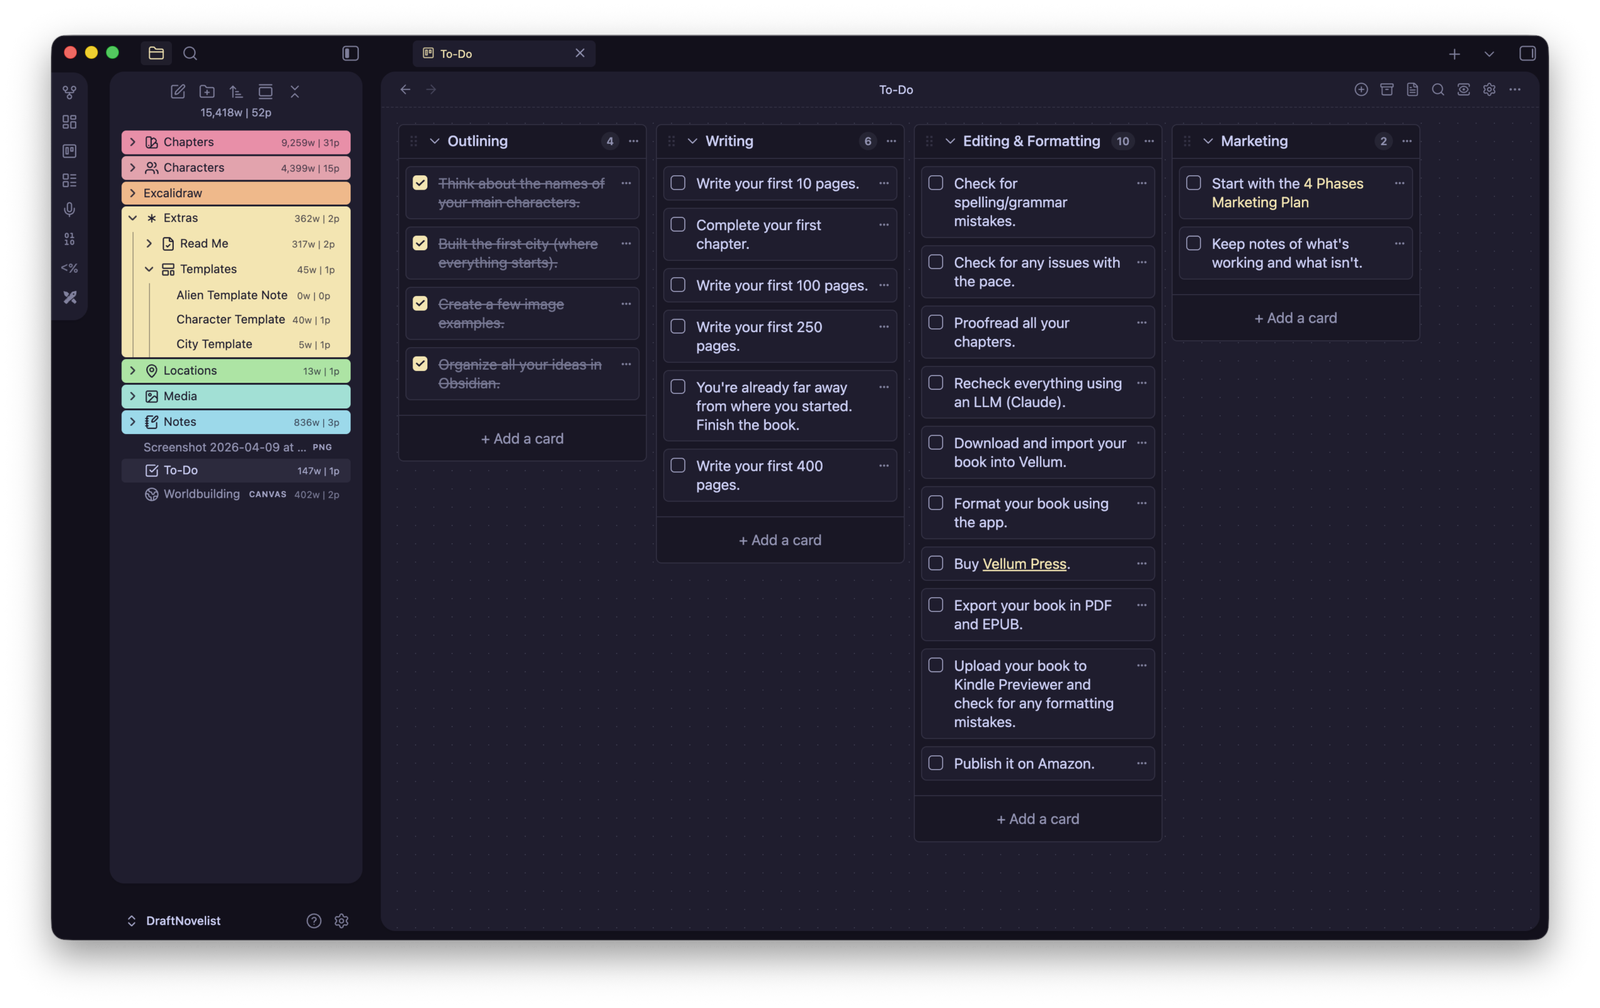
Sometimes, all I want to see is my progress and all the tasks I have to complete. Sometimes, I just want a simple place that’s not distracting me. The “To-Do” note is exactly that place, but unlike traditional notes, it’s built using the Kanban board style.
It’s not hard to use, as you can see from the image example above, just add and delete cards based on the boards that you created. Tick them as finished once done, move them around, and use Markdown format to format them.
Customizing the appearance
There are two ways that you can adjust the appearance of ‘The Novelist’ and everything that Obsidian offers: One from the default settings page, and one from a plugin that’s already installed and enabled for that exact purpose.
1st way: Obsidian Settings
To change Obsidian’s basic appearance settings:
- Click on the ‘Settings‘ icon.
- Go to the ‘Appearance‘ section from the options on the left.
- Switch between ‘Light’ and ‘Dark’ modes, change the theme or the default primary color, and more.
Those are the basic settings. To make more adjustments, head over to the second way.
2nd way: Style Settings
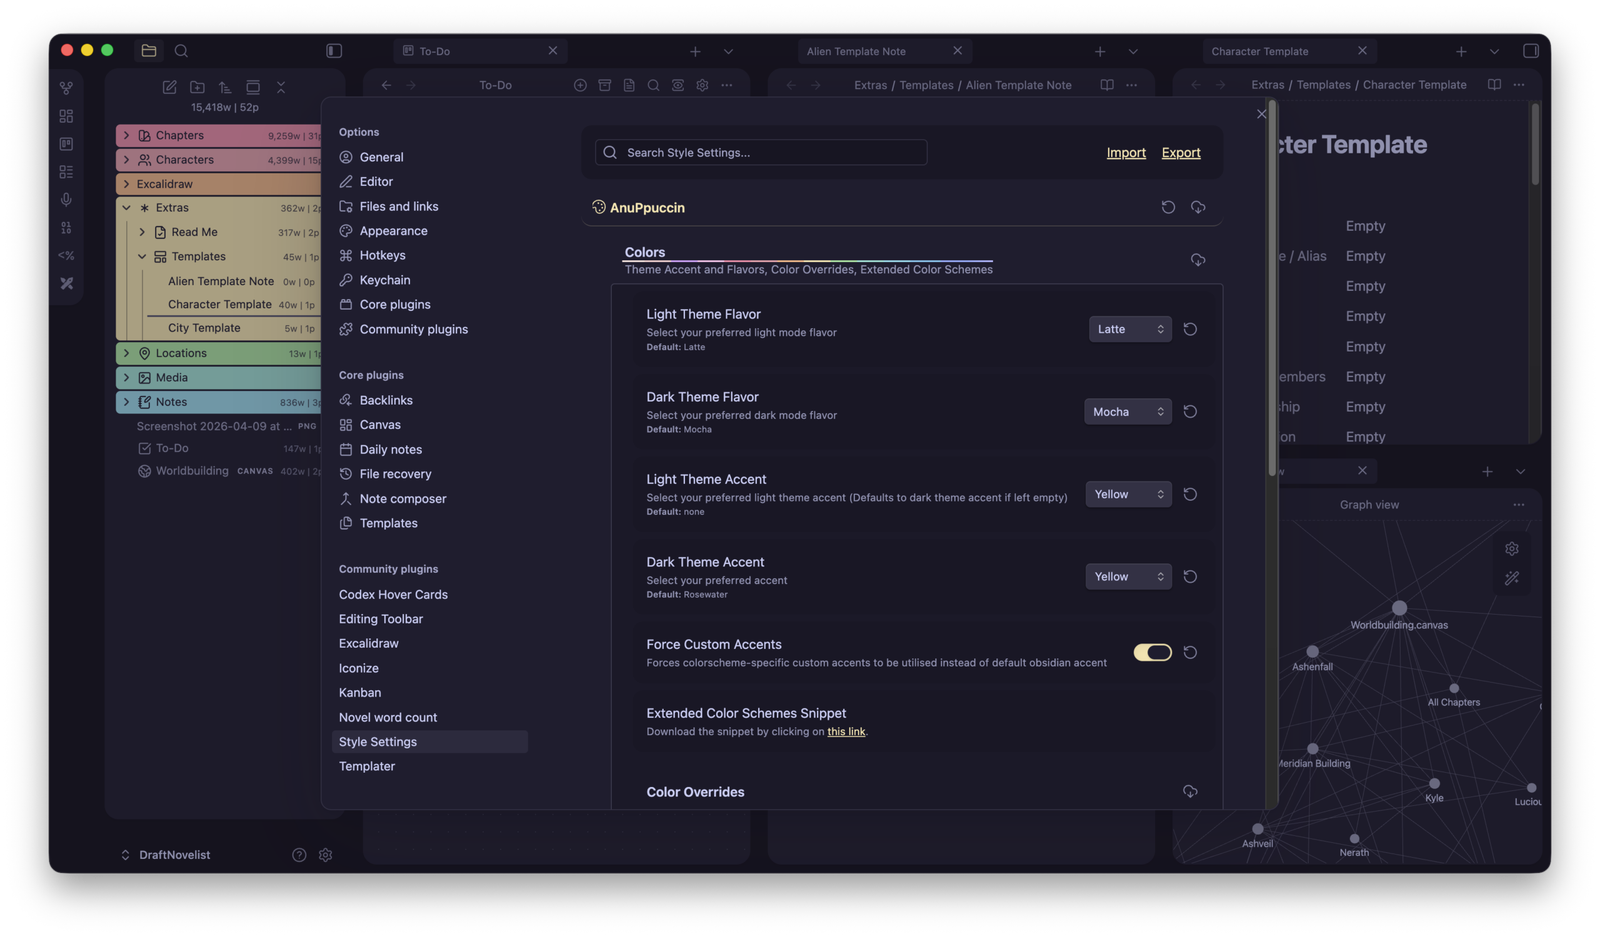
Currently, ‘The Novelist‘ uses the ‘AnuPpuccin‘ theme, which is beautiful, minimal, and colorful (with a few touches of my own). To change its colors and settings and adjust everything:
- Click on the ‘Settings‘ icon.
- Go to the “Style Settings” section.
- Click the AnuPpuccin option to open the options.
- Change the colors, fonts, file editor, elements, and so much more.
Take a minute to take a closer look at Obsidian’s Settings page. Everything is located on the left side, and all the options are on the right side. Check them all out to see what’s possible.
Working with multiple tabs open
One of the things that I love about Obsidian is that it lets you quickly split your tabs and have multiple ones active on the same interface. You can add a new tab to the left or right side, up or down from the current tab.
That means that I can continue writing the chapter I’m focusing on, and instead of changing windows or tabs or even switching between apps, I have another tab on the right side with the notes of that specific chapter. I do that for locations, specific events or dates, characters, etc.
To add a tab on either side, just right-click the note from the ‘File Explorer’ or from the browser-type tabs that are located at the top, and select “Open to the right“.
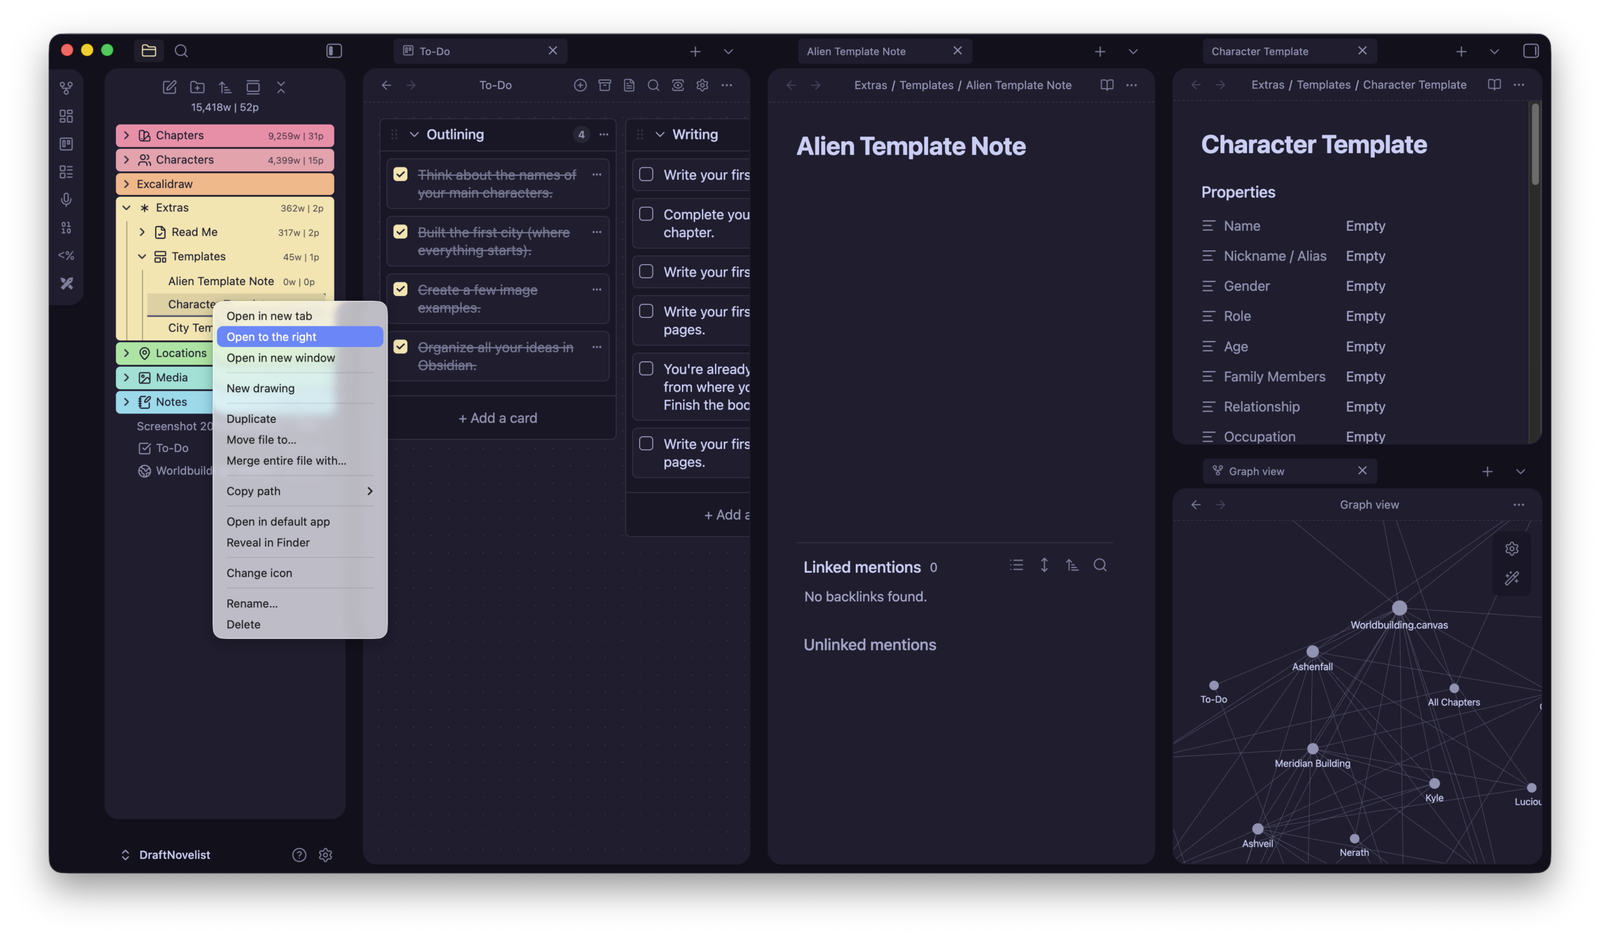
You can then right-click again and select “Split it down” if you want two tabs (one under the other) on that same column.
Setting up ‘Writing Goals’
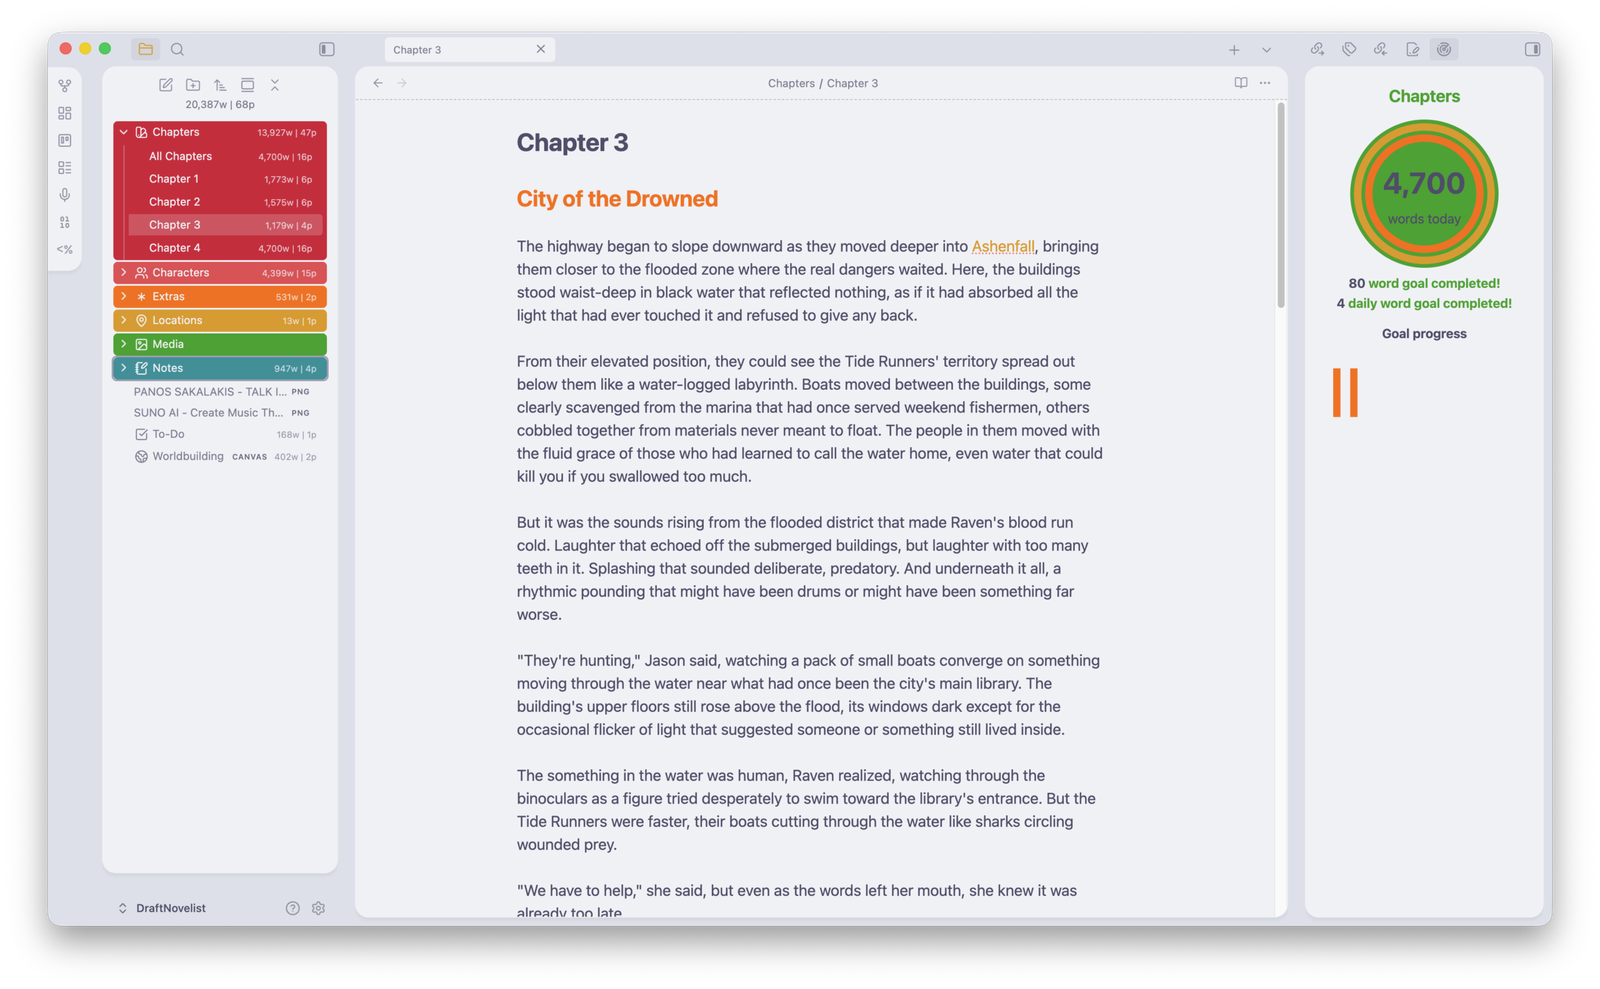
The Novelist includes writing goal tracking:
- Right-click on any folder or file in the Chapters section.
- Select “Add writing goal“.
- Set your daily word count target.
- Track your progress in the left panel.
- The system records your daily word count automatically.
You can disable this feature by going to Settings → Community Plugins → Tracking Goals and disabling the plugin. You can also completely remove it, and if you change your mind in the future, you can reinstall it again.
You can change the style of the ‘Writing Goals‘ plugin by going to Settings → Tracking Goals.
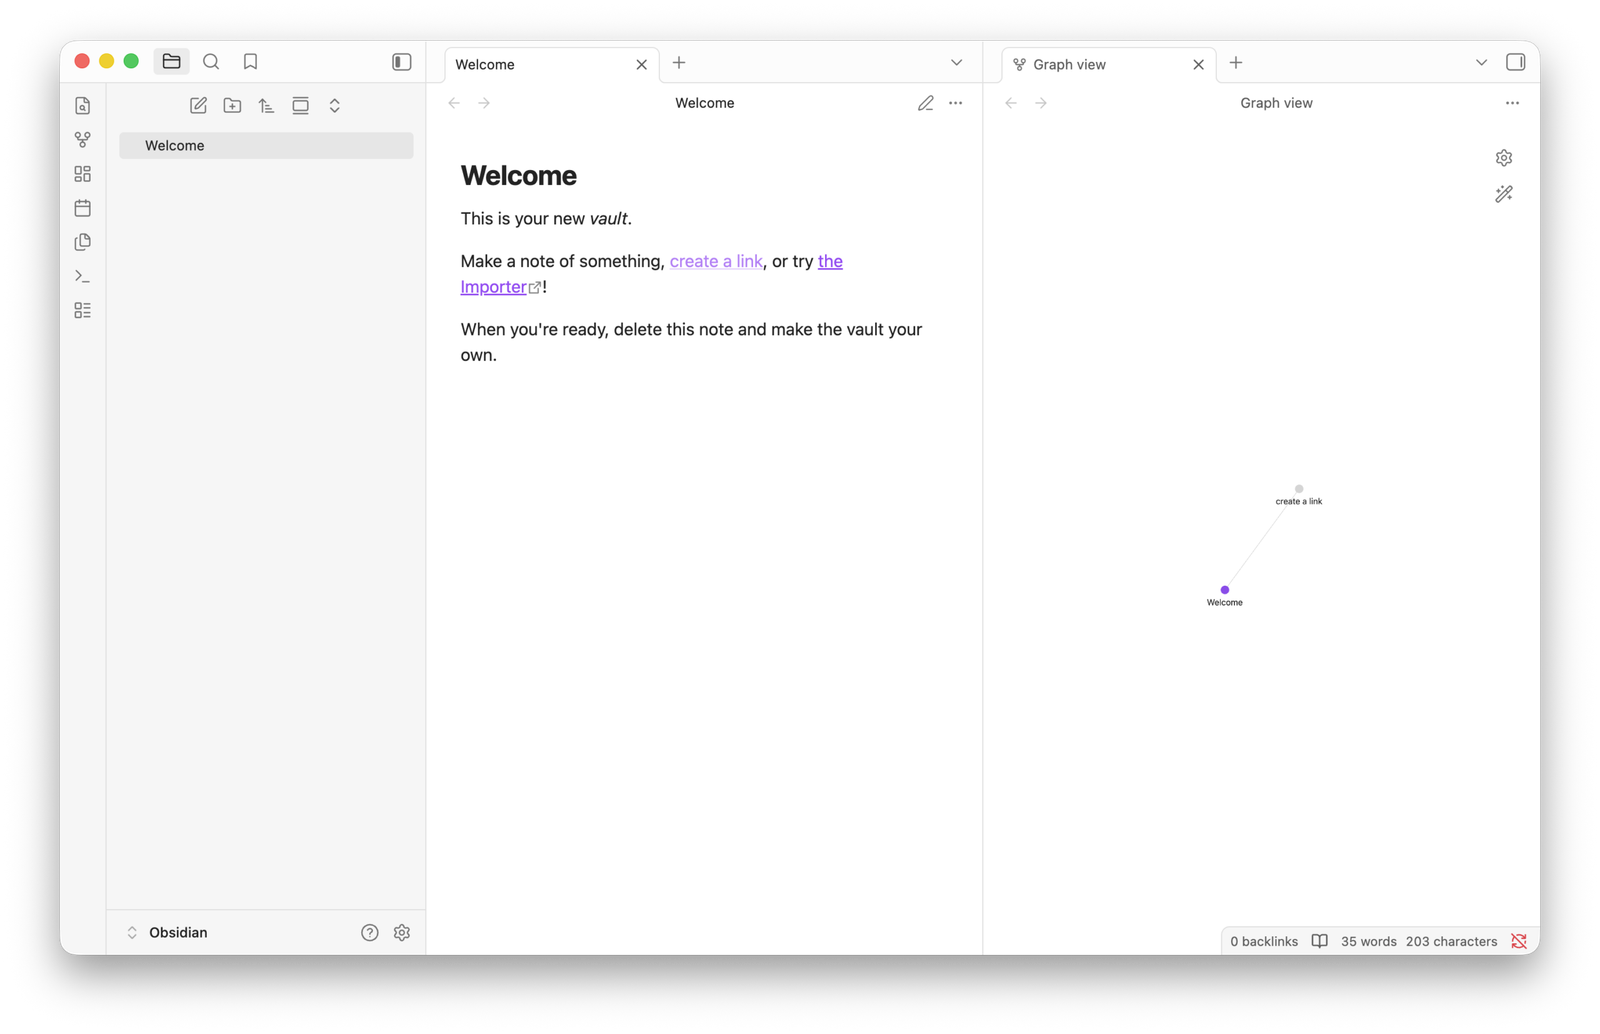
How to access the ‘Graph View’
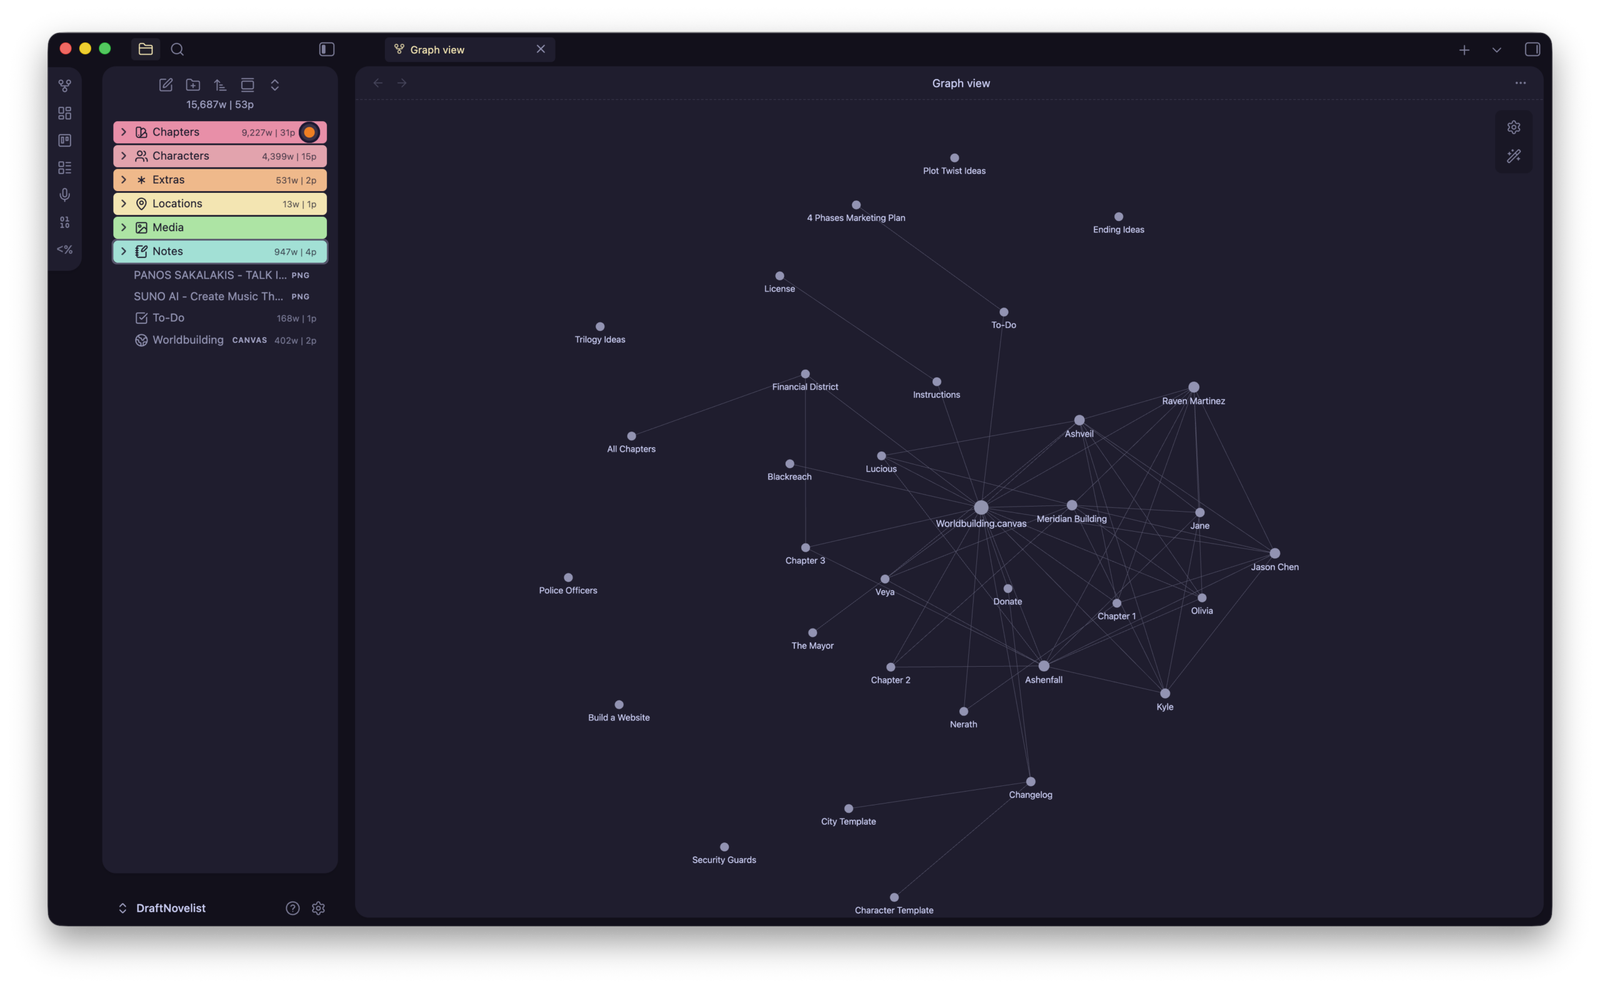
The ‘Graph View’ is a built-in feature that comes with Obsidian. While in the beginning it is not useful, once you have a lot of notes linked with each other, that’s when it can be useful to find lost connections that you may have missed in your story.
To open the ‘Graph View’, just click on its icon on the left panel:

How to backup and/or sync your Vault
Everything that you create and store with Obsidian is located inside your Vault’s folder. If you saved ‘The Novelist‘ and opened it from your ‘Downloads‘ folder, that’s where everything is.
There are many options when it comes to backing up your files or syncing them to a cloud server, and you can choose whatever works better for you:
1. Backing up your Vault manually
In Obsidian’s Settings → File Recovery, you’ll find that I have already enabled the app to constantly and automatically take new snapshots every minute. Those snapshots are saved for a whole week before they get replaced with the newer ones.
But while those snapshots are a great way to restore changes, it’s not enough if something happens, let’s say, to your disk drive, and it suddenly dies. So for that, you can copy the whole folder once you’re done, and paste it on another drive, a cloud platform, etc.
2. Automatically syncing to Dropbox, OneDrive, or Google Drive
The best way to automatically sync all your Vaults across all your devices is by getting a premium tier from Obsidian. If your budget is set to zero, you can use free plugins such as the Remotely Save, Google Drive Sync, or Self-hosted LiveSync to make the whole process automatic.
Install a plugin: Go to Obsidian’s Settings → Community Plugins → Browse → search for any plugin, click on it, and then click “Install” and “Activate“.
3. Automatic backups using cloud desktop apps
If you install the desktop app of any cloud app, including the likes of Dropbox, Google Drive, Microsoft OneDrive, and Terabox, a folder with the platform’s name will appear in your ‘File Manager’, where you can quickly access all your files that are stored in the cloud. Just paste your Vault’s folder there, and then launch Obsidian and open the folder as Vault. Whatever you do, all your chances will be stored automatically in your cloud account.
Frequently asked questions
If you have more questions or are facing any issues, don’t hesitate to contact me.
Do you update ‘The Novelist’?
Yes. You can find all the latest chances on the official Gumroad or GitHub page. All the old versions are also available for download, and you can safely use whichever works better for you.
Can I use it for multiple novels?
Yes, you can duplicate the main folder and rename it for each of your novels/books, or even create a blank new main folder, give it a name, and simply start inserting the pre-made templates.
Can I use it for non-fiction?
Unfortunately, I haven’t designed a version of ‘The Novelist’ for non-fiction authors, but let me tell you that you can absolutely adjust it based on every need. You may have to spend some time renaming the folders and properties, but it should work for non-fiction, too. Such a version is currently being worked on and will be available in the near future.
Can I disable specific features?
Yes, you can disable (and reenable or completely remove) any plugins that you don’t use by going to Settings → Community Plugins. You can also disable the built-in plugins from Settings → Core Plugins.
Do you offer support?
I’ve built ‘The Novelist’ for myself and decided to share it with everybody. I don’t make any money from it, apart from a few donations/tips that you guys were kind enough to send (huge thanks!). I do the best I can to reply to all of your comments and emails within 24 hours, but please do keep in mind that due to some health issues, it may take a bit longer to reply.
How can I support you?
You can share ‘The Obsidian’ with people who may need it. Apart from that, you can donate and buy me a coffee/beer by either buying the product from Gumroad or donating through Buy Me A Coffee or Ko-Fi. You can find all the ways (and a few more) on the Donate page.
Your support means the world to me, and it matters more than you might think.
Useful Obsidian resources for authors
Hohored mentions
I wouldn’t be able to build ‘The Novelist’ without getting inspired by amazing applications that smart, clever, and very skilled people created, and I’d like to mention everything that has inspired the creation of ‘The Novelist’.
Inspirations:
- Dominic (Legend Fiction): Dominic was the first person I saw on YouTube showcasing his Vault. I loved what he made, and it was the first person who inspired me to build ‘The Novelist’ vault.
- Scrivener: This is one of the most popular book-writing software programs the world has ever seen, and for all the good reasons. I was heavily inspired by its design and structure.
- Ulysses: I love many things about Ulysses, including its minimal interface and their cool features for tracking your writing goals – hence the “Writing Goals” plugin I added.
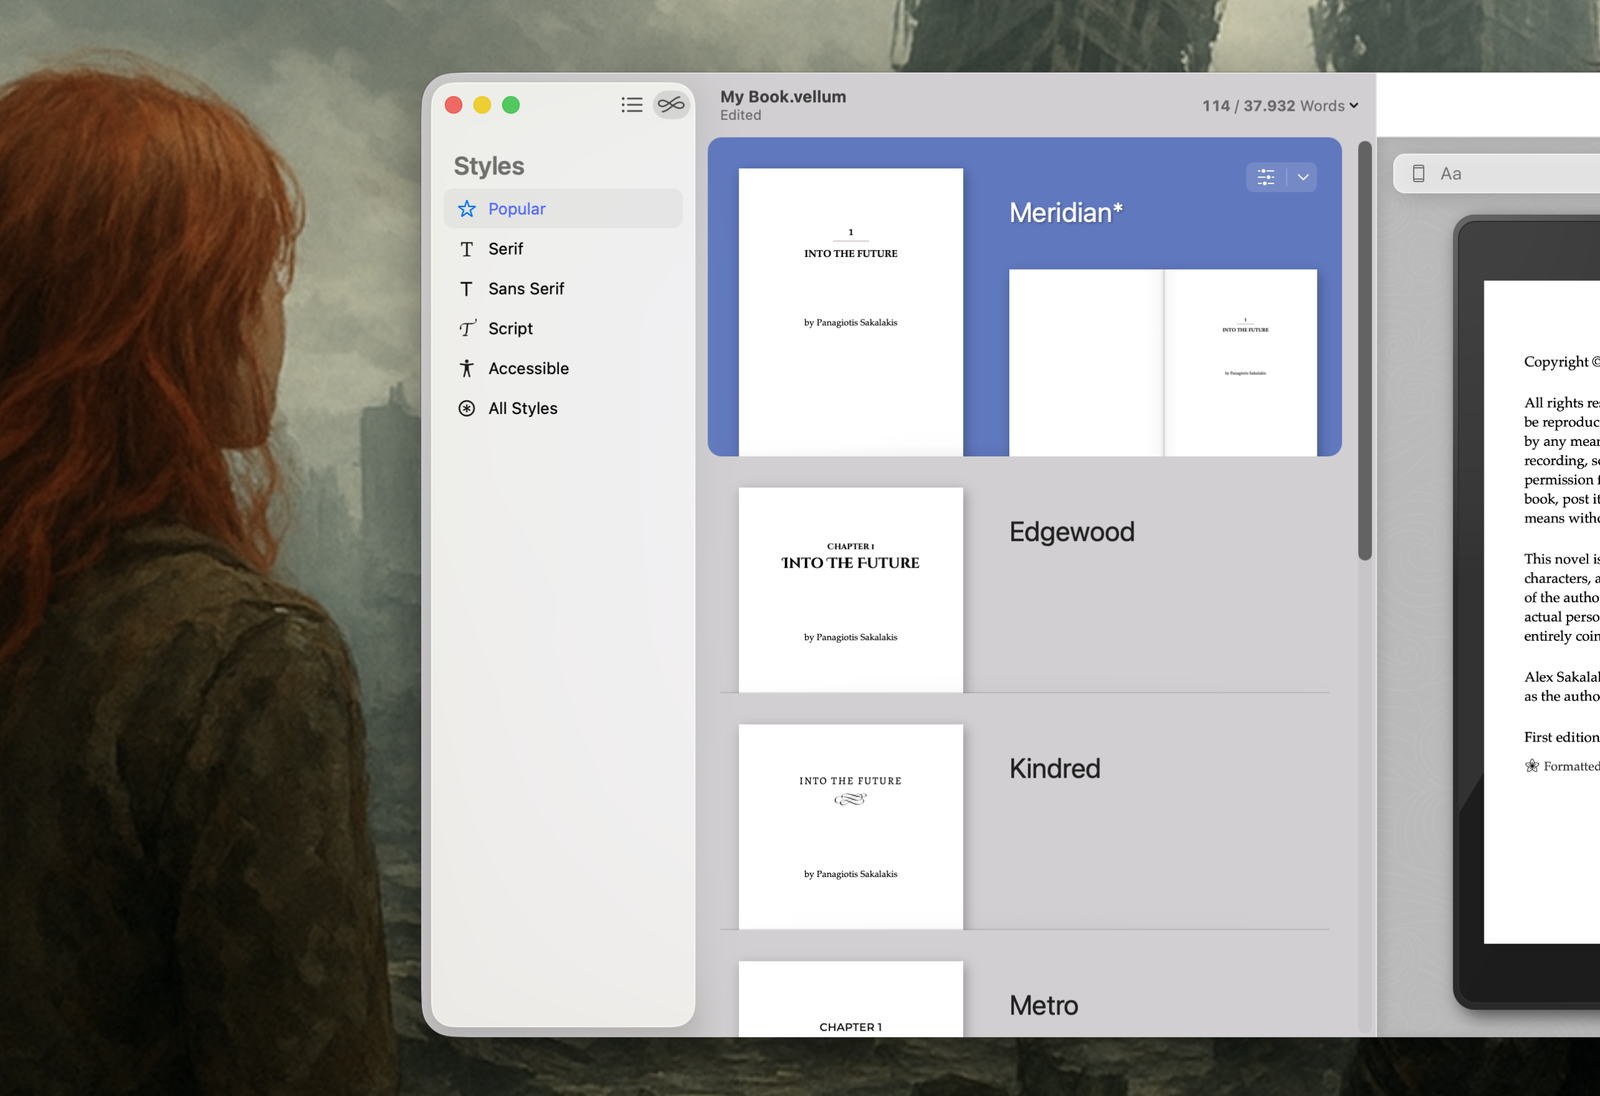
- Vellum: I don’t think anyone can replace this little beautiful beast. But if there’s a book-writing and formatting app that I just love, this is it.
- Meredith Bond: Meredith is an author who has published over 60 titles on Amazon, and she found me through Medium. She was kind enough to email me and send me her own Obsidian Vault (available through her website for free), and allow me to steal her ideas – and I did steal a few of them, which I’ll introduce in the next version. Huge thanks!!
Top Supporters:
You guys mean the world to me ♥️
- Dennis – €20,00 (donated on Gumroad)
- Traci – €20,00 (donated on Gumroad)
- Grampa – €11,00 (donated on Gumroad)
- Douglas – €10,00 (donated on Gumroad)
- Jill – €10,00 (donated on Gumroad)
- Cal – €7,48 (donated on Gumroad)
- Troy – €10,00 (donated on Gumroad)
- Shawn – €10,00 (donated on Gumroad)
- Alicia – €10,00 (donated on Gumroad)
- Eric – €2,99 (donated on Gumroad)
- Geoff – €2,99 (donated on Gumroad)
Your support means so much more than you might think! Thank you very much!


That is excellent, Panos!! Such a simple vault yet so well-put together in a minimal way that makes me (after a long time) actually wake up excited for worldbuilding and writing. Well done sir!
Thank you very much, David! I appreciate your feedback!
Thank you, Panos, for this Novelist Vault. It was fairly easy to install once I figured out that I had an older version of Obsidian on my computer that must have been corrupted. I had downloaded Obsidian years ago but never figured out the writing angle. I own Scrivener as well–another program that seemed so promising yet was too complex for me. You have taken the best parts of Scrivener for writing fiction and combined them in a way that is easy to understand, which makes all the difference! I really like the color combinations you came up with too!
Thank you very much, Mary! Stay tuned for the upcoming update, it’s a big one, and I’d love some feedback 🙂